In a way this is pretty crafty. We just bought our birds a new cage! Yay! However, it required putting it together, which my husband did a great job with, AND a new cover for night time. I got the cage from a shop in Queensland called Pet Luvers. A nice gentleman by the name of Michael, was very patient with me as I called every week for almost two months asking if they came in or not.
Saying this cage is HUGE, would be an understatement. Measuring in at 5'4" across, about 6'1" high, and about 2 1/2' deep, it would actually look better either outside or in a much larger house.
This is only three sides of one side of the cage. My husband is a little taller than 6'.
Putting the second side on.
Almost finished, just needs the trays on the bottom, and the wheels.
Cage in place and Jonah exploring
Jonah, enjoying his deck.
"Hmm, this is different"
Our tiny little living room  , so you can see, we need a bigger place!
Now on to the cover.
Fitting the top... I laid the fabric across the top and let it hang to where the sides would hang straight down.
This is the hardest part and it takes the most time to get this part right. This is pinning the front top together... you can see the little pins, then I cut carefully around the corners to make it a little easier to sew and find the right seam line. I also did this on the back, it just makes it a bit more stable and fitted.
Putting on the sides. Yep, I had to stand on a chair  to get the cover over the top.
And h ere is the finished product
Monday, August 18, 2008
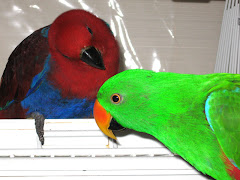
For the benefit of my Eclectus friends

Saturday, August 2, 2008
More violin accessories
This yet another idea that I can't really claim as my own, the design and production, yes, the idea no. My very gifted violin teacher suggested that we needed an accessories bag that somehow attaches to our cases, simply because shoulder rests are too expensive to lose. I went a step further though and decided I needed something that would hold my books as well.
This project, if done start to finish, with a pattern and directions, would have only taken me about a half hour, it was so simple. I started by going to my favorite crafty shop Spotlight. I looked at leather but the vinyl actually matched case so I went with that instead.
First
 , I had to size the vinyl
I figured out the size I would need for a single folded bag, then hemmed one end. And I have to say at this point, my sewing machine breezed through this project. I had expected it to throw a temper tantrum when I asked it to sew through thicker parts, but it didn't. What a champion machine!
I wanted to make reinforcements for the hardware, more specifically where the eyelets are for the jump rings to go through, I didn't want this to come apart at all. So I came up with this...
I basically freehanded one, then traced it three more times. Then where you see the tiny circle drawn on the top one, I used a punch to punch the hole for the eyelets.


I had to really think about how to attach them so I wouldn't sew them wrong, getting them back off would have been a nightmare, not to mention, inevitably a waste of material because I would have tossed it and started over. I'm sorry I don't have pictures of that step, mostly sorry to myself, cause I might forget how I did it!
This is the hardware I decided on. I liked the antique looking hardware, it just looked nicer. However, I didn't end up using the safety pin things. They didn't work so I tried snaps instead. Unfortunately, I couldn't find the same colour snaps.


I used 14 links on both of the two lengths going from the bag to the case. In hindsight, 14 was probably too many, next time I'll try it fewer.
I started out thinking I'd close the bag with those safety pin things and I thought I would reinforce that with eyelets.

It didn't really work, there wasn't enough give to weave the pins through. So I was stuck with these eyelets and wondered what I could put in them to close the bag, after all, it was all about not losing things! But I just couldn't come up with anything I thought would be nice looking, and user friendly. I had considered velcro, but because the books want to unfold once they're in the bag, there's a lot of strain, so I decided against that as well.

The next idea was snaps. I've never done a snap before, I was actually a little afraid of it at first. But after doing my test, it took a little elbow grease, but it wasn't so hard.
And this is the finished product! I'm not too pleased with the wonky look of the closure, but it works like a dream, and it looks professional.

Wednesday, July 2, 2008
Pro - Cras - Tin - A - Tion
Can anyone guess what I'm doing now?!
If you guessed procrastinating... DING DING DING DING! You guessed right!

When I went to my last lesson, my teacher suggested something that, at first, I thought a bit strange, maybe even a little eccentric as well, but it settled in my mind as being what should be. She said "violins love luxury, you should get some silk to wrap it in while its in its case". Then she turned around and said "besides that, it keeps small particles of dust from getting on and in it." Now being the sew-er I am, I thought "wrap it? heck I'll make it a luxury bag! Maybe put a bit of embellishment on it, perhaps a draw string with little gold beads at the ends of the strings..." NOW who's strange and eccentric?!
TWO WEEKS LATER...


and my violin had a comfortable new bed! Ta Da!

By the time I got the silk to cooperate and go through my machine, I was really over it, so there is no draw string, there are no beads... but I think I heard an audible sigh when I placed the violin back in its case...
Monday, January 21, 2008
I got it, I got it, I got it! Finally!
After the promises on Friday, and calling the guy this morning only to hear "I'll call you back in an hour", then NOT hearing from him, I kinda thought this wasn't going to happen again today. Lo and behold, he called me not an hour later, but 2 hours later. Honestly, I thought it was going to be another promised unfulfilled and I was actually beginning to formulate a speech about how I was completely dissatisfied and going elsewhere to get a machine... or quit sewing all together... yeah right.
 I couldn't believe the original styrofoam was still in the case! And of course the locking mechanism for the table is still in tact and holding the table in place.
 Again, it looks like a dinosaur, but the machine is in such good condition it doesn't matter. We tried sewing with it and you could barely hear it and it just swept over the material like a breeze. I was very impressed. We took out the bobbin case and the inside was shiny, like brand new.
 If this woman ever used this machine, you sure couldn't tell. However, there places it needs to be cleaned up, but not many. Unfortunately, the woman that owned this machine died recently and her husband wanted to get rid of it and an overlocker she had. Probably the only reason I own one of these now!
 Now I can get back to this! I went to Janelle's last week and started it on one of her 30 year old Bernina's. Tonight, the borders go on and tomorrow I'll go see Janelle again, but this time it will be for more fabric! Although, only to do the back of this and get the batting for the inside. I'll probably find out how I need to quilt it as well.
 I'm so excited! I feel like I can get back to life now!