Monday, December 15, 2008

A Special Book

I was asked by a client of our IT business (after receiving one of my Christmas cards!), to make a very special birthday card.

The gentleman is turning 90 and just recently had to put his beloved wife into a nursing home. Not a really good week for him, his friends decide to throw him a birthday bash to be held this evening! This gentleman is apparently a favorite within his club, so I knew this had to be special. The person that commissioned me to make it asked that it have space for about 50 people to sign. They suggested maybe A4 (8 1/2 x 11...kinda). As I thought about it, I really couldn't bring myself to make something that size because I knew from experience it would just look a bit tacky.

So off to my local favorite scrapbook shop to see what inspiration I could glean. On one of their shelves someone had created this fabulous mini scrapbook for display, and the inspiration began to take shape. I didn't have any pictures, that probably would have been so good, but didn't have any... Then it hit me, they need places for 50 people to sign. TAGS! What a great idea, and hey, I could make each page a different colour combination, and, and, and... It all got a bit exciting! So below is what I came up with...

If you have looked through my entire blog, you may have recognized the design for the 90. I did a "50" like this on a card in the past. It's just foam core with Japanese paper put on with Jac paper. I cut it all out, stuck it together, then filed the edges with a fingernail file, to age them a bit.


When I saw the mini scrapbook, the person that created it had used this wonderful stamp that said all kinds of nice things, and they had clear embossed it onto the cover, I loved it and decided to borrow the idea. The "celebrate" is a clear plastic thing I thought would work. I used my ever present favourite Dimentional Magic to glue it on, but because I didn't know exactly how to do it, it looks a bit daggy, but A LOT better than the first one I tried, which will continue to rest comfortably in the bottom of the garbage can...


They suggested this for the inside greeting thing. The leaves and branches are done in Versa Mark, as a watermark.


This is the blue page, the first page. Because this is supposed to be a greeting type card/booklet, I decided that the less I embellish the better. I wanted the words that are written to the birthday boy to be the embellishment. I tried to make the tags little handle things different, although I did digress later in the book, it was getting late.


This is the green page. I think I liked this one best, just because its green and it has leaves on it, two of my favorite design things. The tags on the left just have a leaf punch on the top of them, and of course I had to use my Fiskars leaf border punch.


The yellow page


This page was supposed to be brown, well, one side looks brown. They actually look a lot brown-er in person.


The proverbial purple page.


I know, I know... "orange?" I really love the background paper I used on the left side and when I tested it together with this tangerine-ish colour, I really liked it, and I had to make the facing page match a bit. The words say "You are Brilliant, Marvelous, Awesome, Amazing and a Wonderful Friend" and apparently this is the exact sentiment they wanted to communicate. I stamped it in black, then used a positioner to stamp over it with Versa Mark to clear emboss it, so the letters are raised.

When I delivered this little book, the clients were so pleased, and almost speechless. They hadn't expected something quite so elaborate. I also went and found a box to put it in, but it was a very plain box, so I stamped some leaves on that as well. I also included some archival pens for the party attendees to use.

I'm pretty sure I'll be getting a phone call tomorrow!

Wednesday, December 10, 2008

Pastors Christmas Card

Each year I'm asked to make a special card for our Pastors. In this card is placed a love gift from all the congregants. Its a special request and I'm always honoured to be the one asked to make it. So this is what I came up with this year. I had initially planned to make a beautiful shaker card with Christmas trees and white glitter laced powder, but when I saw something similar to this card, I thought this would be better, easier and it wouldn't take as long to create. I think it turned out pretty.


This is the front, of course. The card stock is gorgeous white striped shimmer, that looks a bit silvery.

I carefully spread Dimensional Magic on the back of the lacy ribbon and attached it to the card. I discovered the best way to do this is to spread some DM on a small piece of card stock, then drag the ribbon across it. It tends to cover all surfaces instead of globbing it on the back directly. This reduces the risk of getting too much on and having it come up through the holes in the ribbon.

The dark blue happens to be left overs from my other Christmas cards (see below). I used Fiskars scissors to cut the scallops in it. (What a pain!) Then I cut some gorgeous silk paper with my Aquwash brush and let it fray a bit, and taped it to the blue.


The bauble is a sticker (shock, horror!) and they are stuck on white cardstock. I tried putting them directly on the blue but that turned out to be too dark. I then taped that on to the silk paper.

The individual bits are put on with foam tape, to add dimension.


This is the inside where I provided a little slot to put the gift. In the past, I've just cut two slots, but this year I wanted to try something different. I really like the way it turned out.

I printed up a little greeting for the other side and taped it in. I also made a custom envelope because it was just a bit bigger than a standard legal size envelope.

I've just received another request for a birthday card from a client that received one of my Christmas cards (!), so I need to give them a call and see what they'd like.

Thursday, December 4, 2008

Look what I'm getting!

I've been getting into playing African drums for the last 4 months. I started out trying to play the djembe, but I just couldn't do it, my hands just didn't want to hurt like that all the time! I still don't know how djembe players do it!

After the first class, I approached this wonderful lady, Kate, who was playing what are called dun duns. I told her that I was really expecting the drum I was going to play to be more like hers. She was playing with sticks and the sound coming out of her drums was amazing. I'm not saying the djembes don't sound nice, but the duns (or djun djuns) are so IT for me. I was in love. She said "well, next week, you're playing the djuns!" Cool, I was ready. By the time the next class was over, I knew I would own my own set, I just didn't know when. When the next 8 week term started, my mom had been very generous and I was able to get them.

I've now been waiting over a month. BUT being a crafter, I know what it takes to put real quality into something. I know they're on their way, I know love and attention to detail is going into them, I just have to exercise patience... lol

These are just the shells. They're hand carved and from Ghana West Africa.


When I saw the middle drum in person I could even see where the crafter took a chisel to the inside to make them hollow. All three drums are carved with three designs and each design has a different meaning. I'm having a hard time finding all the meanings, but this is what I know, or what I think I know...

The large drum is called a "Dundunba" and is usually about 15" across

Gye Ntame – 'except God'
Symbol represents the omnipotence of God
and the fearlessness of the faithful.


This could mean one of three things


Nyame dua (an altar to the sky God). Altar, place of worship.
(or)
Nyame nwu na mawu. If Nyame (God) dies, then I may die. Perpetual existence.
(or)
Nyame Dua (God's tree) or (altar of God) Symbol of the Presence of God & God's Protection.


I'm not sure what this one means


The middle drum is called a "Sangban" and is usually about 12" across

Because I have birds, I was most excited about this carving in particular.

However, I don't know the meaning of it.


Pa gya (to strike fire or make fire).
This is said to represent war.
(I'm thinking war on evil!)


I'm pretty sure this means...

Bese Saka (Bunch of cola nuts) Symbol of Affluence, Power, Abundance, Togetherness & Unity.


The small drum is called a "Kenkeni" and is about 10" across

I believe this one is a form of

Kurumah Kese (The big okro.)
Symbol of Greatness & Superiority.


This is the same as the one above,
although it's ever so slightly different.


Again, I think this symbol means the same
as the other two, its just slightly different again.


Aren't they beautiful?! I can hardly wait to get them and will post pictures of them, you can be sure, once they are safely in my home.

Now it's just a matter of getting the skins on with the ropes as you can see in this picture. My skins will still have hair on them, which will kinda freak me out a bit, but I did have the choice of getting them shaved or leaving them as is. I decided to preserve them a bit longer, I'd leave the hair on.

Anxiously awaiting... hmm, seems to me I waited and waited for something else in the near past... I really must pull that sewing machine out. I still haven't finished that black, red and white quilt. It needs to be done before March. Deadlines, gotta love em'!

Christmas Cards 2008

I waited as long as I could to put these up. I realise that some people that are actually getting them, will see them here first... sorry.

This year I had the idea for my cards way back in April when I got the stamp set I used for the design bottom right. I like trying to think outside the box when it comes to stuff like this, although I think about things I've seen before, try to change them, make them better... or, as I do, make them more complicated. Since she's known me, my best friend Michelle always shakes her head as I'm trying to make my day dreams become reality. She sits across from me cranking out 10, 20, 30 cards, to my 1. To this, I shake MY head because her's always look better than mine!

The front


These cards are about 7"x 6", done on acetate. Every piece of cardstock is cut exactly the same, although this is my prototype and doesn't look as perfect as the others.

As you can see, the dove is silver embossed on Midnight blue shimmer card. That then is mounted on a piece of plain white card stock.

Front Detail


I used Staz On Cloud White to stamp the "Joy To The World" and the top left corner design. I then tied the silver cord on the side, just because I thought it needed a little something extra.


For the inside I used White Bazzil Basics, I tried to get something that wasn't textured, but I put it off too long and couldn't get plain stuff so some is textured and some plain.


I used Michelle's "Peace Joy Love" stamp and a stamp from another set I just recently got. It has some gorgeous swirls and such in it. I stamped the words in dark blue brilliance, then stamped off the swirl twice so it wasn't so dark. For the other side, I printed out what I wanted to say, then signed it for a "personal" touch (as if a handmade card needs a personal touch!)

And the back, just another personal touch!


So you can see how the individual pieces of card HAVE to be cut exactly the same, but you know what? They didn't all cut the same. I wish I could figure it out. I even made templates out of really thick opague acetate and drew the lines around it so I'd have guidelines and they STILL didn't cut the same. You just can't imagine the stress this puts a perfectionist under!

Wanna know how many I did? I started out with JUST family, close friends and those I know would appreciate the work put in... this number was 12, and I WASN'T going to do anymore. None. They were done the first weekend in October and I was pretty proud of myself. Then my husband asked me if I was going to send cards to our clients. "Oh, alright, I'll do them for the clients as well." I ended up making 39 in total. And if someone doesn't get one that sees this post, well, I'm really sorry, but I'm so over these cards! There's always next year! And the really fun part is, I've already got ideas rolling around in my head. Perhaps I'll get them done waaay in advance.

Thursday, September 4, 2008

Starfish Shshshaker!

I was commissioned again to make a couple of special cards.

As you all must know by now, my favorite types of cards are shaker cards. Even though they are a pain in the rear, I just love the interactive-ness of them, and the surprise of the recipient is enough to make these cards worth the time spent.

This first card was made for an 18th birthday, for a girl who loves the beach. I had these cute little starfish laying around for a while and felt this was the appropriate time to pull them out. I think these could have been some of the very first embellishments I bought when I started paper crafting almost 8 years ago. The sand is real sand from a beach near our home. How authentic! lol


I started out with white Bazzil Basics cardstock. The frame is a sandwich of Bazzil ribbed cardstock, then a piece of Jac paper, a piece of acetate, another piece of Jac paper, then a piece of thin foam core board to make it a bit stiffer. I only had thin foam tape so there's a couple layers of that.

A shaker secret I learned from a pro (Michelle), is to use Dimensional Magic in the corners on the inside, so just in case you didn't get the tape in the right places, all of the filler won't fall out. I love Dimentional Magic. Its almost a good as super glue!

So after the DM dried, I very carefully flipped the frame over, being careful to leave the top tape paper on so I could funnel the sand in, and placed it. Unfortunately, and this is where I get very real and admit that things don't always work the way they're supposed to... after I had put most of the sand in, for some reason, the frame had gotten stuck down crooked. Grr, I hate crooked and pride myself on things always measuring up, almost perfectly. So instead of being able to just pull it off and replace it, the tape was so sticky it took half the cardstock with it, and some of the tape actually stuck to the card. (rolleyes) So I had to go on a search through my paper box looking for another sheet of this cardstock, come back to the table, clean all the spilled sand off my work space, and give it another try.

The Happy Birthday is stamped with a dark blue Brilliance ink on matching cardstock, which has the edges distressed, then layered on dark blue Bazzil Basics. Then to kinda tie into the Nautical theme, I tied it all together with the red and white ribbon. I have to admit, I did play with it for a bit after it was done. ;-)

The next card was a wedding card. A few years ago I had found this gorgeous pack of scrapbooking paper that I always felt was just too pretty to use for just anything. I had to wait and use it for something special. I KNOW that all serious paper crafters can relate to this. Come on now, admit it, you all have that special piece of paper or card that you can't bare to use...

there, now didn't that feel good to admit that?! lol


Again, I started with Bazzil Basics cardstock, this has the crosshatch design, I think its so elegant. The paper I wrote about above, is the paper on the left side. It's some of the most gorgeous, textured stuff I've seen. It was also matched in the package, with other equally gorgeous papers, this was just my favourite.

I wanted to try something different and used some of the netting I used on the gift I wrapped a couple of posts ago... and I tied it over the left side. I could have used ribbon but didn't want to take anything away from the paper. This netting added a bit of interest.

You can't see it in this picture, and you have to really look for it in person, but I used a stamp that says "love" with VersaMark ink, which provides a bit of a watermark. Just a little detail I like to add. The stamp was big enough that I only stamped it, at an angle, three times.

The hearts are embossed gold on the same colour card and carefully cut out. They are attached with foam tape to give it a bit of dimention.

For the Congratulations, I used my Marvy Marker in red and coloured onto my stamp, stamped it on the same card stock, layered it on a hairline bit of red cardstock, then on some of my favourite gold paper. This is also attached with foam tape for dimension.

Both cards are fully lined with plain paper, and have custom made envelopes.

Monday, August 18, 2008

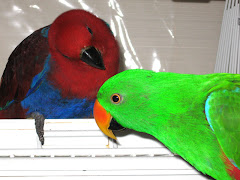
For the benefit of my Eclectus friends

In a way this is pretty crafty. We just bought our birds a new cage! Yay! However, it required putting it together, which my husband did a great job with, AND a new cover for night time. I got the cage from a shop in Queensland called Pet Luvers. A nice gentleman by the name of Michael, was very patient with me as I called every week for almost two months asking if they came in or not.

Saying this cage is HUGE, would be an understatement. Measuring in at 5'4" across, about 6'1" high, and about 2 1/2' deep, it would actually look better either outside or in a much larger house.


This is only three sides of one side of the cage. My husband is a little taller than 6'.


Putting the second side on.


Almost finished, just needs the trays on the bottom, and the wheels.


Cage in place and Jonah exploring

Jonah, enjoying his deck.


"Hmm, this is different"


Our tiny little living room , so you can see, we need a bigger place!


Now on to the cover.

Fitting the top... I laid the fabric across the top and let it hang to where the sides would hang straight down.


This is the hardest part and it takes the most time to get this part right. This is pinning the front top together... you can see the little pins, then I cut carefully around the corners to make it a little easier to sew and find the right seam line. I also did this on the back, it just makes it a bit more stable and fitted.


Putting on the sides. Yep, I had to stand on a chair to get the cover over the top.


And here is the finished product


Wednesday, August 6, 2008

Does inspiration ever take a break?!

There I was, minding my own business. On Sunday mornings I sit in the sound box at church and project the song words and scriptures from a computer for the congregation. I was keeping up fairly well with the Pastor as she called out the scriptures she was going to read.

Then in happened...

All of a sudden this gorgeous fabric that Janelle has at Pieces to Treasure, came to mind. I swear it was almost tangibly in front of my eyes. Crystal clear. For the next few minutes I had to really focus on my duties, but secretly, I started drawing.

There is a couple in our church that are getting married and their engagement party is this weekend. No, I didn't decide on Sunday to make a quilt for them, well, I did, but I don't plan to give it to them this weekend. I had already bought them some gorgeous towels and a game, but this latest inspiration was so meant for them. So I figured I would just give this to them as well, perhaps for a bridal shower gift or something.


This is the pattern that Janelle
deciphered from my drawing.


I also have to say that Janelle was an absolute life saver with this. I told her what I wanted and she figured out all the measurements and how much fabric I'd need of each colour, she's just amazing!

The stars of the show, aren't they lucious?! The white swirl was the culprit. You can't really tell here, but the red fabric has red roses on it and the gray has a leafy pattern. You can click on the pictures and they will come up in another window so you can see more detail, but you'll need to hit the back button on your browser window to come back each time.


And here's the progression. You'll notice there isn't a 3rd border listed, I guess I forgot to take a picture
Cutting, cutting
and more cutting


There's still a red binding to go on, but I need to get with Janelle again to get the batting and some final instruction as far as quilting goes. I'm not really sure what I want to do with the quilting, it really needs something, there are some ideas and inspirations wafting around, but I'll probably have to wait till next Sunday morning for them to show up! lol